In a previous article I detailed the installation of new MeisterR GT1 coilovers : https://wardiz.org/blog/2017/10/29/new-coilovers/

After I setup everything I wanted to remain close from original ground clearance (approximately 14cm). But the front bracket of the coilovers won’t allow this setting as they are too short. This meant the ground clearance became 11cm and that was somehow no longer pratical. 13cm would have been nice, even 12cm but not 11cm.
I contacted MeisterR to explain the issue I had and it occured they already take care of that problem with longer front bracket on new GT1 coilovers.
All I have to do was to order the new brackets and they arrived fast. Here are the old and new brackets side to side (old on the left, new on the right) :

MeisterR_longer_bracket

As you can see the new bracket is 30mm longer so it provides more height adjustment. Fitting is super easy (thanks to my impact wrench,a Makita DTW285 : 400Nm to loose bolt needless to say it’s on of the best tool I have for mecanical work. I bought it because I already have a Makita tool. Price is fair on amazon).

Once fitted it was easy to adjust the ground clearance to 13cm !

Depuis que j’ai écrit mes articles sur l’homologation, il y a eu de nombreuses questions posées et des thèmes que je n’avais pas forcément abordés et des documents que je n’ai pas publiés mais faisant partie intégrante de l’homologation.

« Grâce aux confinements », j’ai donc entrepris il y a plusieurs mois d’écrire un livre sur l’homologation qui va beaucoup plus loin que les 2 ou 3 articles que vous avez déjà pu lire. Le guide n’est pas orienté pour une voiture en particulier, tous les conseils et détails sont applicables aussi bien à une voiture japonaise qu’américaine.

couverture_blog

En ce qui concerne l’édition, passer par un éditeur traditionnel m’aurait sans doute demander des mois de recherches et d’efforts sans garantir un aboutissement, je me suis donc tourné vers Amazon qui met à disposition des auteurs une plateforme d’auto-édition. Pour le moment vous trouverez mon guide sur Amazon au prix de 15euros 12 euros disponible au lien suivant : Homologuer une voiture importée du Japon ou des USA (ou en cliquant sur la couverture ci-dessus). A ma connaissance c’est le seul ouvrage couvrant le sujet.

Je travaille à le rendre disponible sur une autre plateforme d’édition dans les semaines à venir afin de vous proposer une alternative à Amazon.

, , , , , , , , , , , , ,

Je viens de voir qu’un des livres que j’ai acheté il y a qqes années est à nouveau disponible, il s’agit de celui-ci :

Book_nissan_skyline_limited_edition

Ca n’est pas un livre à proprement parler mais plutôt une compilation d’articles parus au fil du temps dans des magazines. En anglais y sont abordés les 3 générations de Skylines, R32, R33 et R34, tantôt avec des comparaisons avec d’autres modèles (Mitsubishi, Audi S4, etc etc), tantôt des articles à part entière. Il est intéressant pour un premier livre et le prix est correct, si par contre vous possédez déjà d’autres livres sur le sujet, il n’est clairement pas indispensable car vous n’apprendrez  sans doute pas grand chose de nouveau !

La nouvelle version dispose de couvertures couleur, mais le reste est en noir et blanc (le lien vous emmène directement sur la page amazon du livre) :

Book_nissan_skyline_limited_edition_v2

A quick article about adapting a keyfob from a late model on a early model of R34.

R34 remote control

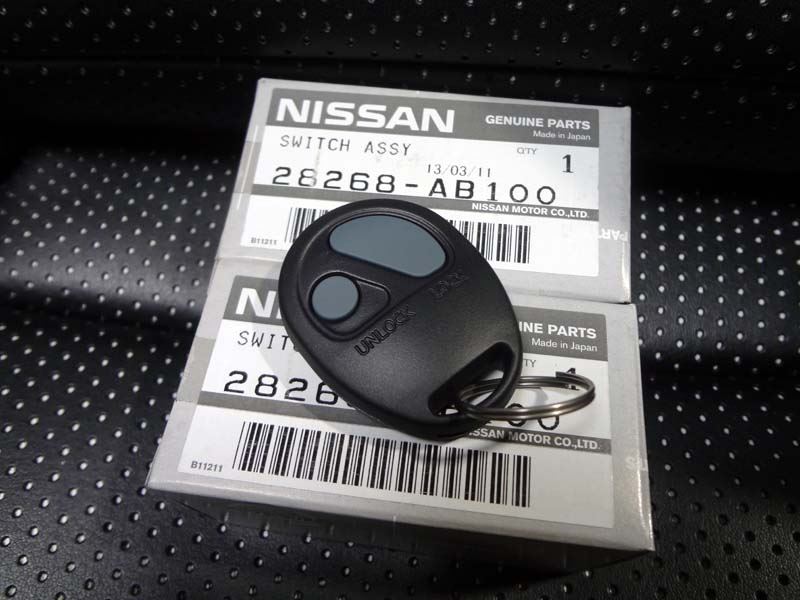
If you have an early R34 no matter the version (GT-R, GT-T, V-spec, …) at some point you may want or wanted to get a new remote control. Saddly keyfob for early models are discontinued now. Fortunately keyfob for later models are still available (part number is 28268-AB100) … but it will not work with early model as Nissan obviously did some incompatible changes.

There is a solution to make the late keyfob model works on early models !

First thing to understand is the keyfob works with a keyless entry control unit (sometimes called a smart entry module or control unit). Thus the OEM keyless entry needs to be replaced. It can be done without too much pain. You will need to find a keyless entry module from another Nissan model that’s compatible with the late remote control.

I don’t have an exhaustive list of the compatible modules but basically it must comes from a model that works with the following key part number : 285A1-C9921.

Modules can be second hands and they usually cost around 30€ (there are more expensive unit without any benefit). I sourced a keyless entry module from a S15 late model (part number 28595-85F10). Beware that the connector won’t be compatible but it’s not an issue as I’ll show you how to make a adapter for the existing connector.

The keyless entry control unit from a late R34 should obviously works as well.

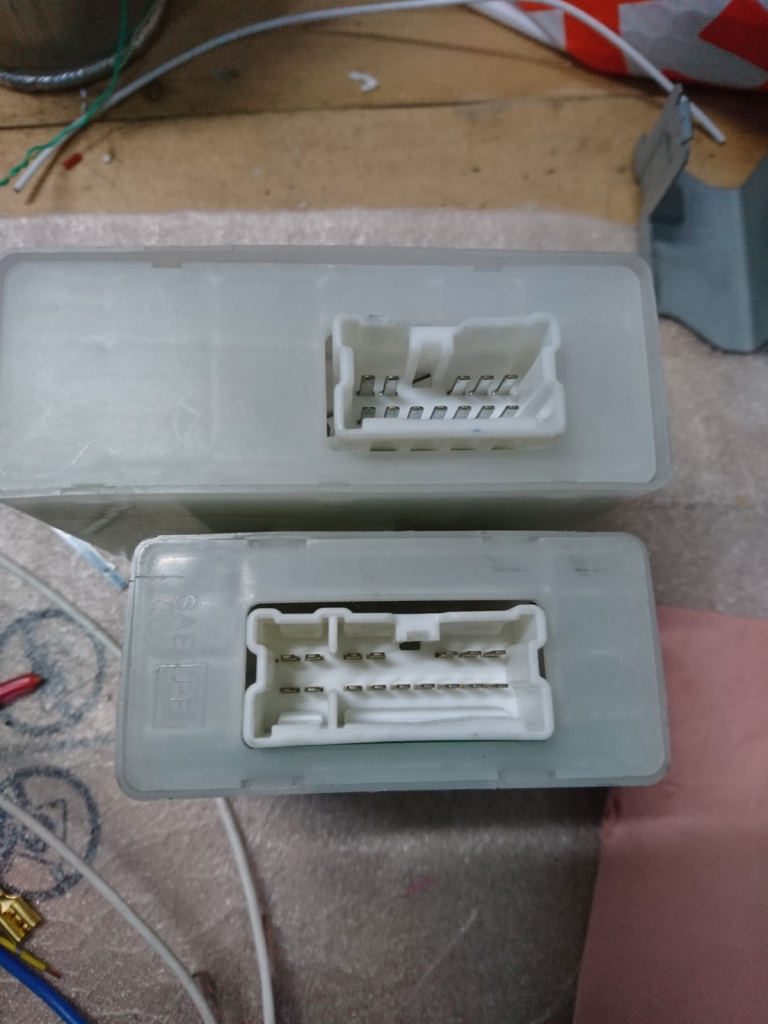
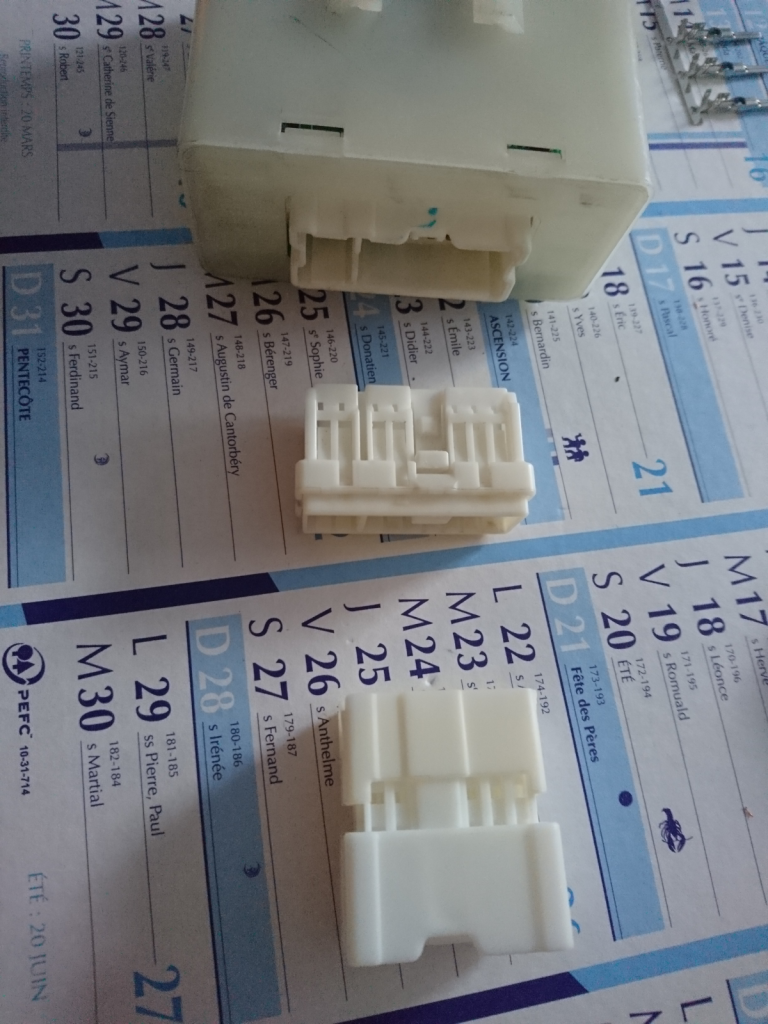
Below are both connectors : first the early connector and second the later connector (it has four more pins). I wasn’t able to find a suitable keyless entry module from a USA or European model. It looks like the donnor car has to be japanese or australian.

R34_S15_keyless_entry_connector

Once you have your keyless module entry you need to source the wiring diagram. Even if it’s written in japanese you can compare it to the early model with english comments and find out quickly they are very similar.
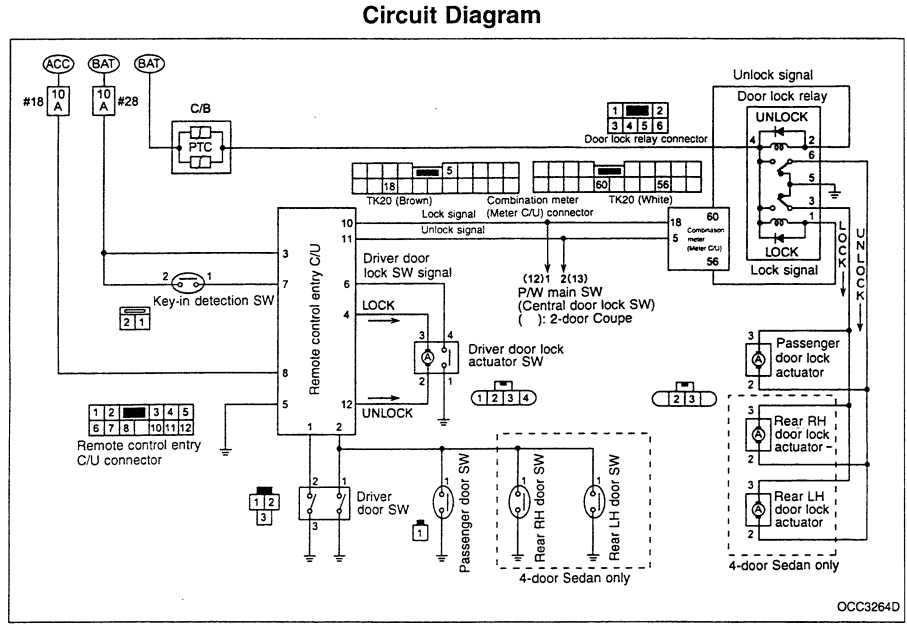
Below is the wiring schema of the R34 early model (12 pins but 11 in use).

R34 early keyless entry wiring

And now the wiring schema of a keyless entry module from a  180sx :

180SX remote control unit wiring

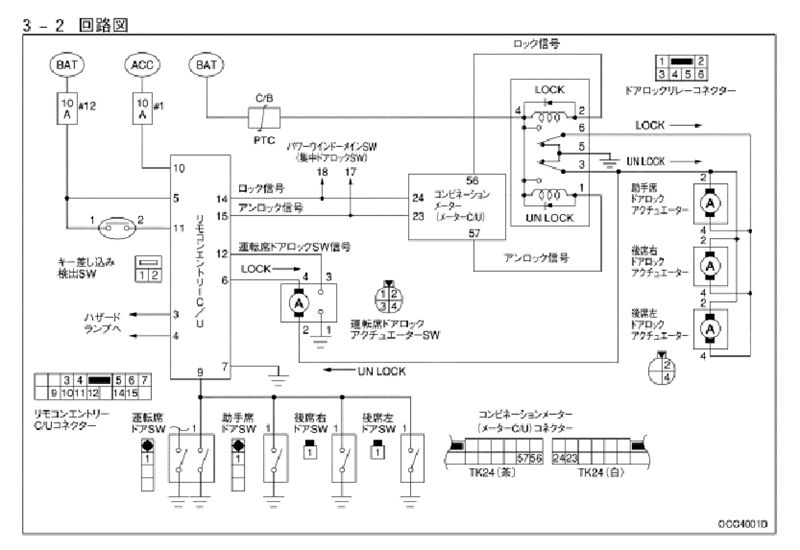
Did you notice I sourced a S15 keyless entry module but I used the wiring schema from a 180sx ? They are basically the same are they share the same wiring. That’s a thing to recall : for a given period (around 2000-2002 years) most keyless entry modules are very similar : you can probably rely on fact that a module with the 16 pins connector should fit but always check the wiring schema before !

Comparing the two diagrams here are the corresponding pins with the early R34 module and the S15 module :

Pin correspondance
Description 12 pin connector 16 pin connector
Driver door switch input signal 1 not used
All door switch input signal 2 9
Battery 3 5
Driver door lock actuator lock output signal 4 6
Ground 5 7
Driver door lock switch signal 6 12
Key-in detector switch input signal 7 11
Acc power supply 8 10
Not used 9 not used
Passenger door lock output signal 10 14
Passenger door unlock output signal 11 15
Driver door lock actuator unlock ouput signal 12 (*1)
N/A 13 N/A
Warning switch left N/A 3
Warning switch right N/A 4

1* : on the 12 pin plug (not the keyless module), pin #12 should be be connected to the pin #6  of the relay connector.

Original schema with S15 keyless entry box : in black the original pin number, in red the S15 pin number and the additionnal wiring :

R34_keyless_entry_wiring_modified

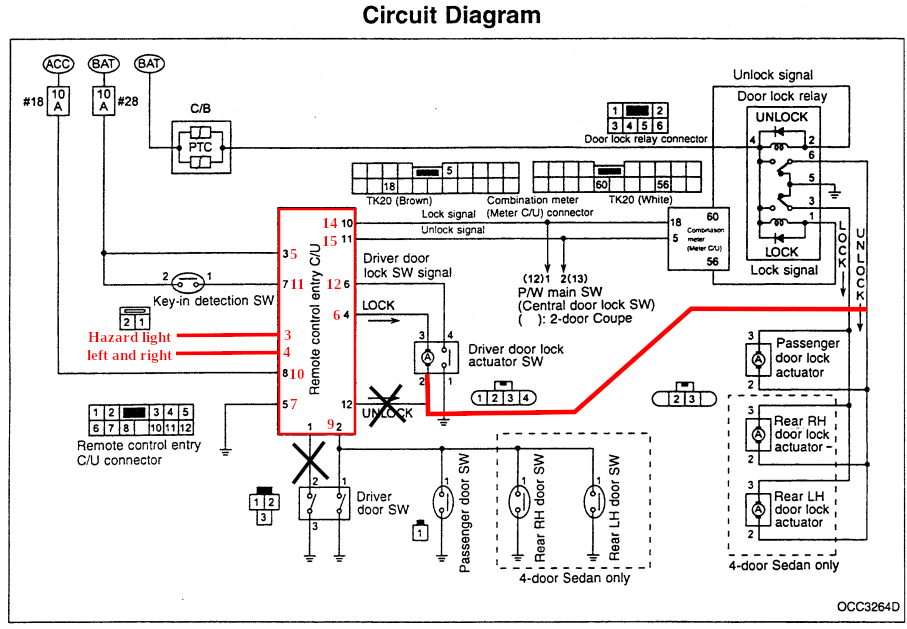
The new « wire » (in red) replaces the lack of Unlock signal from the keyless entry module. The unlock signal is taken from the door lock relay connector (pin #6) … and goes on pin12 of the OEM connector (thus going to pin #2 of driver door lock actuator switch). There might be an easier routing but I haven’t dig that much as this solution works well.

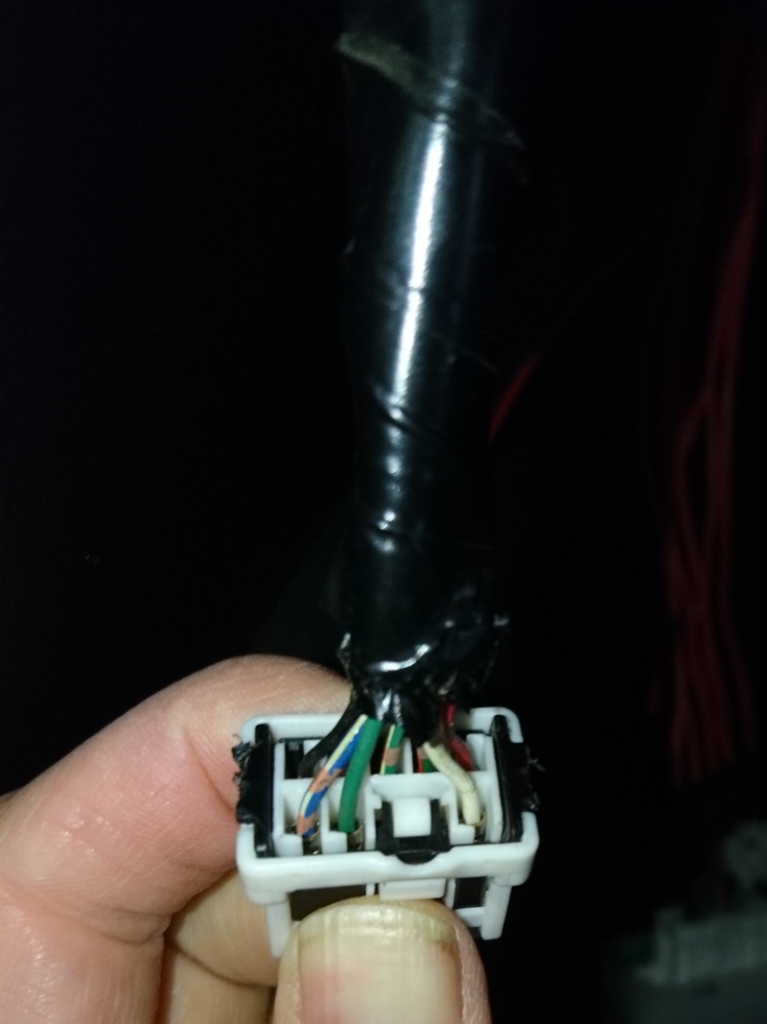
New pins #3 and #4 should be connected to pins #1 and #2 of the hazard light switch (so you get a feed back with hazard lights when locking or unlocking doors with the remote control). That’s the white wire and the green wire on the picture :

R34_hazard_switch_connector

Making the adapter

To perform the job you need to remove the panel under the steering wheel so you have easy access to the keyless entry module and the door lock relay.

Below is the S15 keyless entry control unit, the matching 16 pin connector and a 12 pin connector (that will be plugged on the OEM connector). I also sourced the proper pins (male and female) to make the adapter. See the end of the article where to source the connectors and the pins.

R34_to_S15_keyless_entry_adapter

Below is the adapter mostly done. The long white wire goes to the pin #6 of the driver door lock actuator switch : remember that on the OEM keyless control unit pin#12 (unlock signal) goes to pin #2 of the driver door lock actuator switch. Doing this routes the unlock signal to the door lock actuator switch. The two wires (with bullet terminals) are connected to pin #1 and pin #2 of the hazard switch.

R34_keyless_adapter_finished

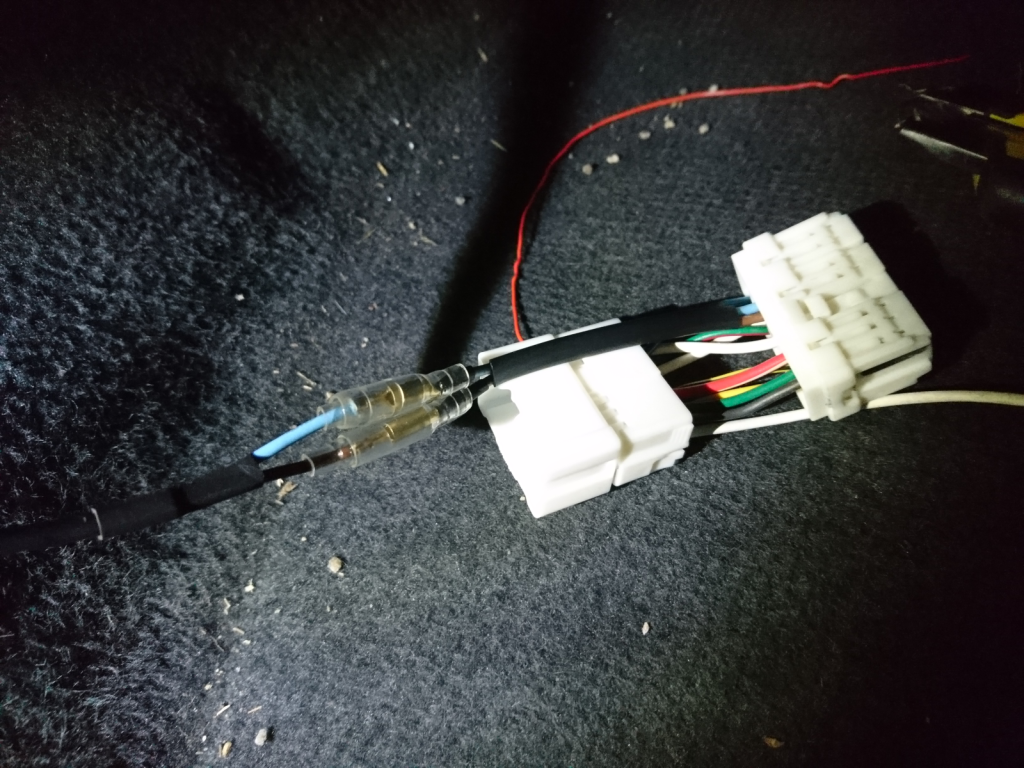
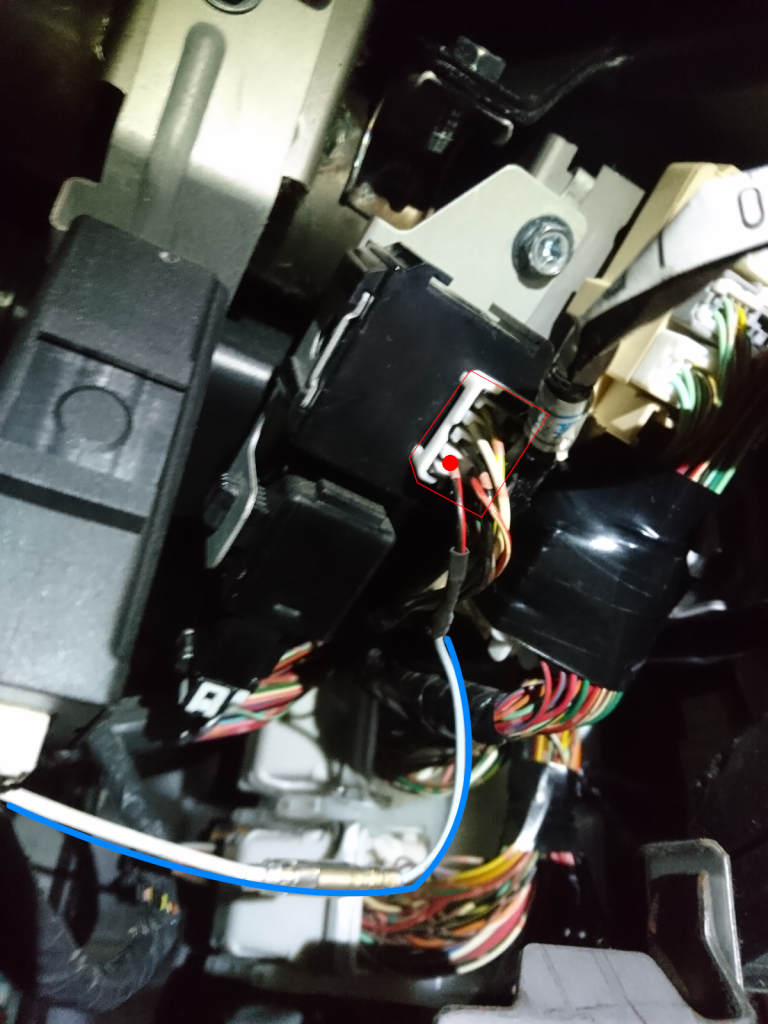
Below a picture of the door lock relay and it connector. You can see the wire from pin #1 going to pin #12 of 12 pin plug.

R34_door_lock_relay_connector

Now how to register the new keyfob : same procedure as the R34 with one exception : after the 6th time you insert/remove key the passenger door will unlock but not the driver door : unlock it, lock it, insert the key and turn it on ACC then press any button of the new remote control. You have to perform smoothly the moves for this to work but within 3 seconds. If you’re successfull the passenger door should lock : you’re done !

You can get the 12 pins and 16 pins connectors from here : https://item.rakuten.co.jp/auc-hi-1000/16p090-nslc-f-tr and https://item.rakuten.co.jp/auc-hi-1000/12p090-nslc-m-tr, don’t forget to order the male and female pins. It’s best to order a little more than require is case you waste some of them if you’re not confortable with a crimp plier (and it’s really cheap)

This is the crimp plier I’ve been using (I bought it from amazon) :

IWISS 1424A_1

, , , ,

RB26 oil filter block

It’s an article about the oil filter block where the oil filter is attached. Under the plenum is located the oil filter block. On standard RB26 engine the oil filter block includes a kind of « water-cooled oil cooler », as seen in the picture below.

OLYMPUS DIGITAL CAMERA

The basic principle is that the body of the block lets water go through it to cool down the oil (they’re two nipples on the left of the oil filter block). Being small and located very closed to the engine you can imagine it not very effective.

You can find some pros and cons about the effectiveness of that water-cooled oil cooler on various forums about the Skyline. What has not been very discuss is the alternative found on N1 engine. On N1 engines the oil filter block is different. Check out the image below taken from the Nissan workshop manual :

RB_N1_oil_block_filter

You can see the oil filter block has no longer the water cooler nipples and it’s smaller. But it has two new plugs for oil lines …. heading to an air oil cooler ! On N1 engine the water-cooled oil filter block is replaced by a smaller oil filter block working with an oil cooler. It makes more room under the plenum (less pipes and smaller oil filter block) and it’s more effective :

RB_N1_oil_block_filter_cooler

Sadely that oil filter block is no longer available from Nissan and it might has been difficult to use because of the specific oil tubes attached to it. But I found 4 alternatives  !

They will require to relocate the oil filter but it’s a good thing as the original filter location always lead to oil drops and it’s inconvenient in every way.

  • a Ross performance https://rossperformanceparts.com/product/nissan-rb-oil-return-adaptor/
  • a Ross Tuffbond https://rawbrokerage.com/collections/rb30/products/ross-tuffbond-remote-oil-filter-adapter-for-nissan-rb20-rb25-rb26
  • a Taarks https://www.efisolutions.com.au/oil-block-an10-rb20-rb25-rb26-rb30
  • a JHH Racing https://jhhracing.com.au/products/jhh-racing-rb-oil-distribution-blocks

That’s the 4 I found but there might be others. Just make sure the one you will choose accept the OEM sensors (oil pressure and oil temp).

They will accept AN-10 and AN-12 fittings. The ross-tuffbond version is the only one in AN-12 the other are in AN-10 but will work with AN-12 adapters.

That how it looks once installed :

Taarks

Should you go for AN-10 or AN-12 ?

Both will be enough to flow oil to the oil cooler without pressure drop so it makes no difference from a performance point of view. For a very long time Nismo optional oil cooler was using AN-12 lines. But their latest oil cooler option uses AN-10. And HKS and other japanese brands have been using AN-10 and these big brands can be trusted.

AN-10 will be slighty smaller so easier to fit when you don’t have much space around so probably best to go with AN-10.

I went for the Taarks because you can use the OEM sensors and you can use either AN-10 or AN-12 fittings.

I’m sure many of you have seen R26 engine bays like this :

RB26_remote_oil_filter_engine_bay

For sure it’s bling but I don’t like it as it’s way too easy to drop oil when changing the oil filter. Let me show you what japanese guys do :

1/ Interesting location but it’s weird to have the oil cooler in such location. But oil filter is easy to change without messing with the oil.

rb26-oil-filter-relocation-3

2/ Weird location but I doubt it’s easy to remove the oil filter and it’s too much closer to the alternator for my taste.

rb26-oil-filter-relocation-5

3/ I like the location of this one. It’s one of the area where there is room to relocate the oil filter. But I’m not convince by the lines heading to the oil filter as they would contact with the engine bay tray.

rb26-oil-filter-relocation-4

4/ Same location but different position. Lines going to the oil cooler leave room for the under tray engine and the oil filter is easy to remove. That’s my favorite.

rb26-oil-filter-relocation-1


, , , ,