
![]()
How to diagnose a faulty oxygen sensor on a Nissan R34 GTR and how to replace it.
Update on January 8th 2021 !
After chatting with a member of https://www.gtr.co.uk I decided to make a small update.
Before starting and to avoid confusion, there are 2 oxygen sensors on a R32/R33R34 GTR. The O2 sensors of R33 and R34 GTR are the same but the R32 one’s are different.
I will explain how to check if the 2 oxygen sensors in a R34 GTR (also valid for a R33 GTR) are dead and how to replace the one that is easy to reach. I’ll do another article for the other sensor.
One can see the 2 sensors on the above picture : the one that is difficult to access is in red the easy one is in orange.

The issue
Bringing the car through technical inspection (French MoT), it appeared that the CO rate was too high and that the lambda value was bad: the CO was 2.25% instead of 0.3%, these measurements were performed at idle and at a very low RPM . A high CO rate may come from an oxygen sensor fault or from a decat car … I decided to investigate the o2 sensor following some smart advices.
Analyze the sensors of the car: Nissan DataScan
The CO must be lower than 0.3% at idle to register the car in France (all cars built after 99 must meet this standard or they cannot pass the French MoT) I decided to invest in the Nissan DataScan software with USB cable available from Blazt.
Equipped with a laptop PC go and simply connect the PC to the car with the USB cable on the ODB plug located below the steering wheel.
The software can monitor most of the sensors / probes of the car and you can save the data to analyse it off-line. One can observe the behavior of oxygen sensors … and this is how I saw that one of the two sensors were stuffed. At idle the standard electrical signal is a sinuzoïde oscillating between 0 and 1 Volt. On the image below showing the signal of 2 sensors of the car it is clear that one them does not oscillate but is completely dead.

When the sensors are operating normally the diagram is as follows:

Finding a replacement probe
The oxygen sensors installed on the car are from Bosch (it’s writen on it) and the Nissan part numbers are 22690 24U00 and 22690 24U01. Genuine sensors cost lots of money : over 245 euros for 2 probes (available at Kudosmotorsports for example).
It seems overpriced since it is Bosch made and the price of common o2 sensors usually oscillates between 80 and 100 euros. After a long and painful search and some interesting leads (NTK sensors, the site Nissan parts and alternatives), I ended up finding this Bosch document (pdf 10MB, 519 pages). On page 504 we find the references of the genuine sensor … and its universal model replacement: 0 258 005 726
Bosch offers universal oxygen sensors that replace many existing and legacy models. According to their catalog, the universal model number 0 258 005 726 can replace Nissan 22690 24U00 and 22690 24U01 (among others).
The universal sensor is supplied a universal plug which can be connected to the genuine connector.
I order two of these in case both the o2 sensor were dead or to have a spare one. The probes are available on the site www.oscaro.com at a price of 87 euros (or from autoparts123)
The proper tool to remove the probe
Problem: a special tool is required to remove the sensor. The tool looks like a socket spark plug but which is open on one side to leave some space for the sensor wires :

The tool is available on rueducommerce for 51 euros or on ebay for 10 euros (on www.ebay.co.uk search for oxygen sensor socket). The holder must fit a 22mm socket. Expect also to buy a 3/8″ universal joint because there is not much space to place the sensor socket on the o2 sensor …
In use :

Remove the probe
As said earlier in the article, there are two sensors: one easily accessible that does not require any disassembly. Some parts must be disassembled for the other one.
This is how to replace the easily accessible sensor. Before attempting to disassemble I have 3 tips:
– the socket probe must be used with a universal joint and it must be placed directly on the socket. A tube that will prevent you from putting something else on the socket
– use some water-displacing spray (WD40) and have a one hour break
– after one hour place the socket as shown below :

For my part I used a tyre wrench (cross wrench) to unscrew the sensor …
The guilty sensor removed. Looking at fault images on Bosch site can help you to diagnose what was wrong :-/

Prepare the universal probe
You basically have two choices regarding the sensor plug : use the adapter provided by Bosch or use OEM terminals !
Using Bosch adater
An instruction manual is provided with the universal probe and I’m not going to rewrite it (available here)
Quick steps to follow in our case :
– cut the wiring of the genuine sensor 10 cm from the end of connector
– measure the length of the original sensor and cut the wire of the universal sensor to the same length

– strip 1cm (3/8 « ) of wire insulation from all wire ends properly. On the picture you can see that some stray wire sticking out. They must be twisted together to avoid potential problems and they are easier to move in the yellow connectors.

– Install the « posi-lock » system as shown above (see instructions for details)
-tighten firmly.
– Assemble the two ends snapping the cap. That’s it.
This is the universal probe assembled with the original connector :

One should leave the plastic cap on the sensor. The sensor is fragile and could be damaged by chock.
Using OEM terminals
This solution will allow you to have a 100% OEM look.The real deal was to source OEM terminals …. I finally manage to found terminals from https://hi-1000.shop-pro.jp (order 10 of them). You can also order them from https://www.rakuten.co.jp. Once you have them use a plier to make good crimp to make a good connection. Wires are close from the turbo so I would not recommand welding here but only a good and firm crimp.
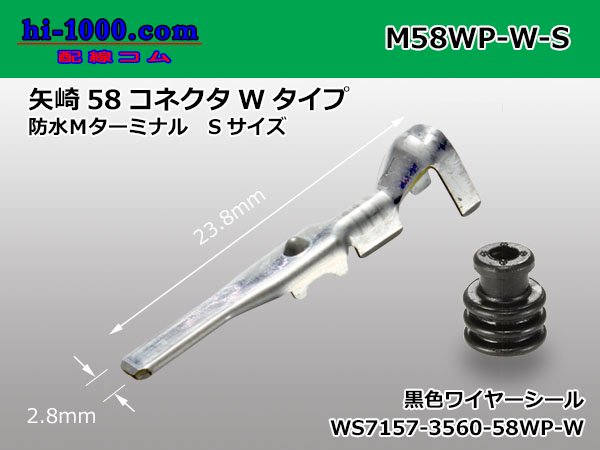
Do not mix wires ! Put some labels on them before to remove gently the terminals from the plug. I bought my plier from amazon and they’re the best crimp I made. That way you have a brand new oxygen sensor as you would get with an OEM solution.
In case you broke your plug you can order a set (plug and adapter) from aliexpress with this link : Nissan oxygen sensor plug with terminals
Installation
Check you have easy access to the sensor installation location and remove the plastic cap and screw it on by hand. The thread of the probe is already greased by Bosch so there is nothing special to add. Tighten the probe (the torque is 40mn).
Plug in the sensor connector and you are done.

Test that everything is ok
When the engine is warm – take a ride for 5 or 10 min at normal engine speed then connect the laptop on the car and run DataScan Nissan. Start recording data for oxygen sensor at idle.
The analysis of the graph should look like this: the sensors are performing their sinusoidal cycle meaning the probes are OK. After monitoring in a garage, the rate of CO is 0.1%, bingo 😀
Useful links
- Order the o2 sensor from www.oscaro.com or from autoparts123
- Bosch catalog on oxygen sensor
- Probe sockets on ebay (UK)
- Nissan DataScan software from Blazt
Comments and questions are welcome. Sorry for the many mistakes, feel free to correct me where I’m wrong 😉
Many thanks to James.D for reviewing and correcting my article.
Was wondering, what’s really the size of the socket needed to remove thes 02 sensors?? Some GT-R (32-34) owners say 17mm, some 22mm. Confused guy here. 🙂
Hi,
I just checked it’s a 22mm socket for O2 sensor on R34. I believe that’s the same for the R33 but it’s a different one on R32.